Article sections
Initial Configuration Steps:
- Connect your PC’s network card to LAN port 1 of the FW80CM internal interface.
- Set your PCs IP address to 192.168.1.100 with a subnet mask of 255.255.255.0.
- Open up your web browser and head over to https://192.168.1.99
- The default login for this switch is the username ‘admin’ with a blank password.
VLAN Configuration Steps:
It’s now time to begin the configuration of the VLANs. Please note that I’ve written this guide with this particular configuration in mind :
- WAN1 of the FW80CM will be connected to the BTU
- DMZ of the FW80CM will be connected to the IPTV STB
- LAN port 1~6 of the FW80CM will be connected to your PC & network device
- WiFi of the FW80CM for Laptop with WiFi capable
Note: This guide is written based on FortiOS v4.3 (Steps should be more or less then same for any other MR)
To get your VLAN configuration running, simply follow these settings :
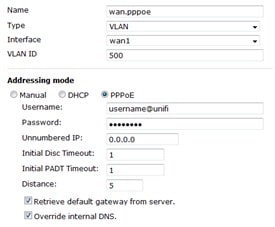
Create a VLAN500 for PPPoE:
1) Go to “System” > “Network” > “Interface”
2) Click “Create New”
3) Follow the settings in the screenshot, and configure your UniFi username & password accordingly:
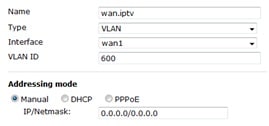
Create a VLAN600 for IPTV (ignore this step if you not plan to use IPTV):
1) Go to “System” > “Network” > “Interface”
2) Click “Create New”
3) Follow the settings in the screenshot change to vlan 400
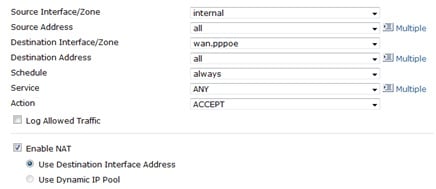
Configure firewall policy for internal/WiFi to PPPoE interface:
1) Purge all the default firewall policies, it’s not applicable in this case
2) Internal to PPPoE:
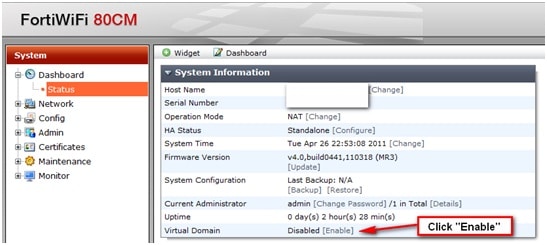
Configure bridge connection for IPTV (Ignore this steps if you not plan to use IPTV):
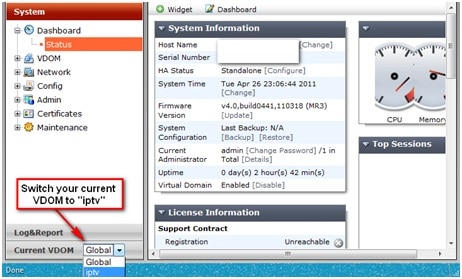
1) Enable VDOM (Virtual Domain) via System Status
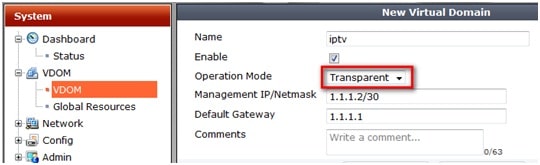
2) Go to System > VDOM > VDOM, create a new VDOM “iptv”
– make sure Operation Mode is “Transparent”, configure dummy IP for Management IP & Default Gateway
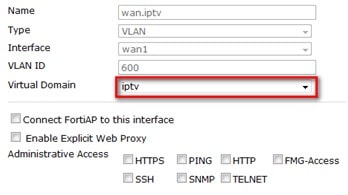
3) Go to “System” > “Network” > “Interface”, change VDOM for “wan.iptv” &” dmz” port
4) Switch current VDOM to “iptv”:
5) Create inbound & outbound firewall policy for “wan.iptv” & “dmz”

6) Switch the VDOM to Global, go to “System” > “Dashboard” > “Status”, you will see a java base CLI console:
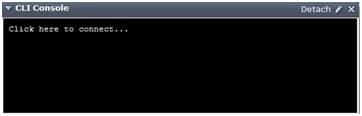
7) Type the command given below to enable bypass multicast policy:
config vdom
edit iptv
config system settings
set multicast-skip-policy enable
end
if VDOM is not enable, please use following command to activate
To enable VDOM configuration – GU
Log in with a super_admin account.
Go to System > Settings.
Under Operations Settings, enable Virtual Domains.
To enable VDOM configuration – CLI:
config system global
set vdom-admin enable
end
if transparent mode is not appear/activate use command
Option 1
In your screenshot you need to create the VDOM from GUI.
Then change the Operation mode in CLI below
config vdom
edit (Your VDOM name)
config system settings
set opmode transparent
set inspection-mode flow
set manageip XX.XX.XX.XX 255.255.255.0 (Your internal segment IP subnet)
end
Option 2
Create new VDOM via CLI, and set opration mode to transparent
config vdom
edit (Your VDOM name)
config system settings
set opmode transparent
set inspection-mode flow
set manageip XX.XX.XX.XX 255.255.255.0 (Your internal segment IP subnet)
end